Table of Contents
Track Assets and Generate New Insights
Jira Service Management’s native asset and configuration management tool, Assets, enables tracking various assets, configurations, and resources, providing valuable insights into relationships between applications, services, and infrastructure. Available for JSM Cloud Premium, Enterprise, and JSM Data Center subscriptions, it offers a comprehensive view of your IT ecosystem.
This article demonstrates how Jira users with access to the Assets tool can create insightful reports based on Asset Objects. We’ll guide you through the process of creating a new custom field, using an Automation rule, and generating a sample report with the Asset Name field in Performance Objectives: Charts for Jira.
You will add a custom field that uses your Asset information to convert the unique object ID of the Asset into a recognizable Name for reporting. This is necessary because of certain limitations in the Jira API.
In this tutorial, we assume that you have already created your asset schema and established a custom field connection to your JSM project. If you haven’t done this yet, you can find more information on the official Atlassian page: Set up the Assets objects custom field. Let’s get started!
Create Asset Name Retrieval Field
To add a new field of type “Labels” and associate it with the project where you intend to use it, follow these steps:
⚙️ → Issues → Custom fields → Create custom field
- Go to the project settings in Jira.
- Click on “Issues” and then “Custom fields.”
- Select “Create Custom Field” and choose the “Labels” field type.
- Name the field “Asset Name” or any other name that suits your needs and save the changes.
- Optional: Associate this new custom field with the relevant project by selecting the project under “Contexts” while configuring the field.
To avoid incidental edits of the field we don’t recommend adding it to the screen of your projects.
For a visual guide, you can refer to the video below:
Create Automation Rule to Retrieve the Asset Name
To display your Assets in reporting gadgets, you must create an Automation rule using the “Labels” custom field you just created. Follow these steps:
- Navigate to your project’s left-hand menu, then go to Project settings → Automation → Create Rule.
- For the Trigger, choose “Field value changed.”
- For the Component, select “Edit issue Field” → “More options” → “Additional fields.”
- In “Additional fields,” remove any old text and paste the following:
{
    "fields": {
        "Asset Name": {{issue."Office Equipment".Name.asJsonStringArray.replace(" ","-")}}

    }
}
In the provided code, the first field represents the “Labels” field (Asset Name), while the second field represents the Asset objects (Office Equipment).
The “Asset Name” will be assigned the same values as the “Office Equipment” field. The remaining part of the code processes the Object list by separating it into an array of values and removing any empty spaces between them.
If, for any reason, the code does not work as expected, please double-check that you haven’t left any spaces or extra characters while naming your custom fields. Another solution would be to refer to the fields using their unique field IDs instead. If you want to use the custom ID of the field, replace the field names with the notation below, where “X” is the unique ID of the field.
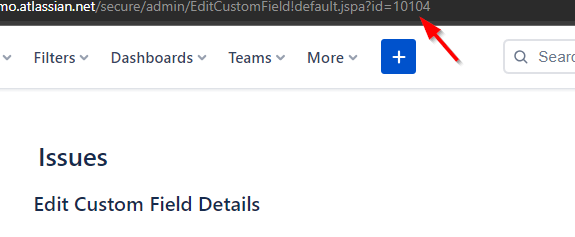
customfield_XYou can find the ID if you open your Custom Fields and click on “Edit Details” option of the 3-dot menu of the field. The ID will be at the end of the URL. In our example, the field’s ID should appear as customfield_10104 in the code.
For a visual guide, you can refer to the video below:
Create Reports Utilizing Asset Name
Ensuring that the newly created ‘Asset Name’ field is populated with relevant and meaningful data is crucial for your reporting needs. Your team can easily accomplish this during their day-to-day work activities.
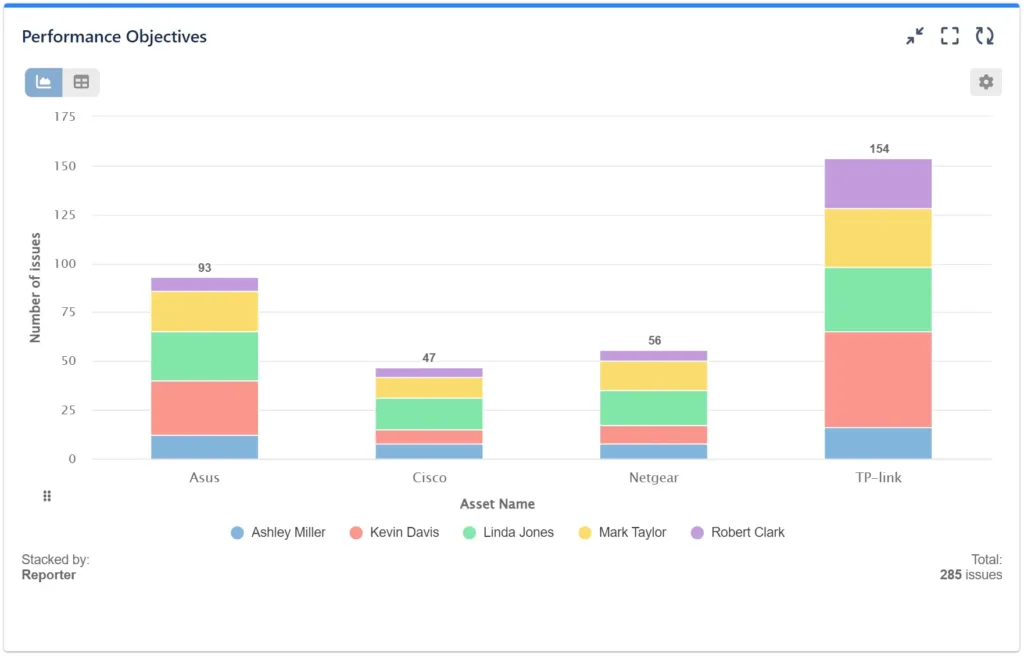
With the ‘Asset Name’ now available as text field type, you can use it for Display by, Group by, and Stacked by data view options in the Performance Objectives: Charts for Jira app. This opens up possibilities for creating visualizations such as Stacked Bar Chart to effectively display the most requested Assets within your specified timeframe, or Venn diagram, to illustrate intersections of different assets.
Explore other essential reports and KPI examples you can build on your Jira dashboard with Performance Objectives: Charts for Jira app.
To learn more about all the app features, please refer to our User Guide.
Start your 30 days free trial of Performance Objectives: Charts for Jira from Atlassian Marketplace.