Table of Contents
Enable Root Cause Field in Jira
In this article, we’ll guide you through the process of setting up a custom field to collect data for root cause analysis in Jira, building upon the concepts introduced in our previous article, “Root Cause Analysis and RCA report in Jira“.
For this tutorial, we assume that you’ve already set up your project in Jira and have configured your issue types. If not, Atlassian provides a helpful guide for this process: Create a new project | Jira Software Cloud | Atlassian Support
Phase 1: Create Root Cause Custom Field
To add a new custom field called “Root Cause” and associate it with the project where you intend to use it, follow these steps:
⚙️ → Issues → Custom fields → Create custom field
- Navigate to the project settings
- Click on “Issues” and then “Custom fields”
- Select “Create Custom Field” and opt for the “Select List (single choice)” field type
- List your Root Cause options. In our previous article, we provided a selection of suggested root causes. You have the flexibility to utilize all of these suggestions, select those that are relevant to your business or create entirely new ones
- Name the field “Root cause” and save the changes
- Associate the field to the “_YOUR_Project_Key:Scrum Bug Screen”
- Optionally return to the custom fields list and look for the field “Root cause”. Click on the 3-dot menu and associate the field with a relevant project by selecting the project under “Contexts” during configuration
Now, you’ll be able to fill in the “Root Cause” field directly from the Bug issue screen whenever you need it, ensuring it’s not left empty.
For a visual demonstration, please refer to the video below:
Phase 2: Integrate the Custom Field to Bugs’ Resolution Screen
To ensure your custom field isn’t overlooked and is consistently used to gather the necessary data for future analysis, follow this second configuration phase. This involves creating a separate workflow dedicated to handling Bugs. Additionally, integrating a resolution screen is crucial when transitioning Bugs to the “Done” column. This screen serves as a checkpoint for team members to input relevant data, including making a root cause selection, before finalizing the resolution of Bugs. To further enhance this setup, adding validation to the resolution screen is recommended. Validation ensures that the required information is consistently and accurately provided, facilitating thorough data gathering for comprehensive root cause analysis in Jira.
Below are the detailed configuration steps:
⚙️ → Issues → Workflows
- Click on the three-dot menu of the current scheme used by your project
- Select “Copy” and provide a suitable name for the copied scheme
- Navigate to the “Workflow schemes” from the right-hand menu
- Under the scheme used by the project from Step 1, click on “Edit”
- Add a workflow by selecting “Add Existing” and choose the workflow created in Step 2
- Click on “Next” associate the workflow only with the Bug issue type, and then click on “Finish”
- Click on “Publish”. If you have existing Bug issues in your board, an associate button will appear
- Return to the “Workflows” from the right-side menu.
- You should now see your Bug workflow. Click on the three-dots menu and select “Edit”
- Choose the “Diagram” view and click on the transition/s that go to the “Done” status
- On the right menu, click “Edit” Then, select the screen (in our case, the Resolve screen) where the “Root Cause” was associated, and click “Save”
- Optionally, you can add the “Field Required Validator” to ensure that filling the Root Cause field is mandatory during transitions.
- Finally, back up and publish the edited workflow
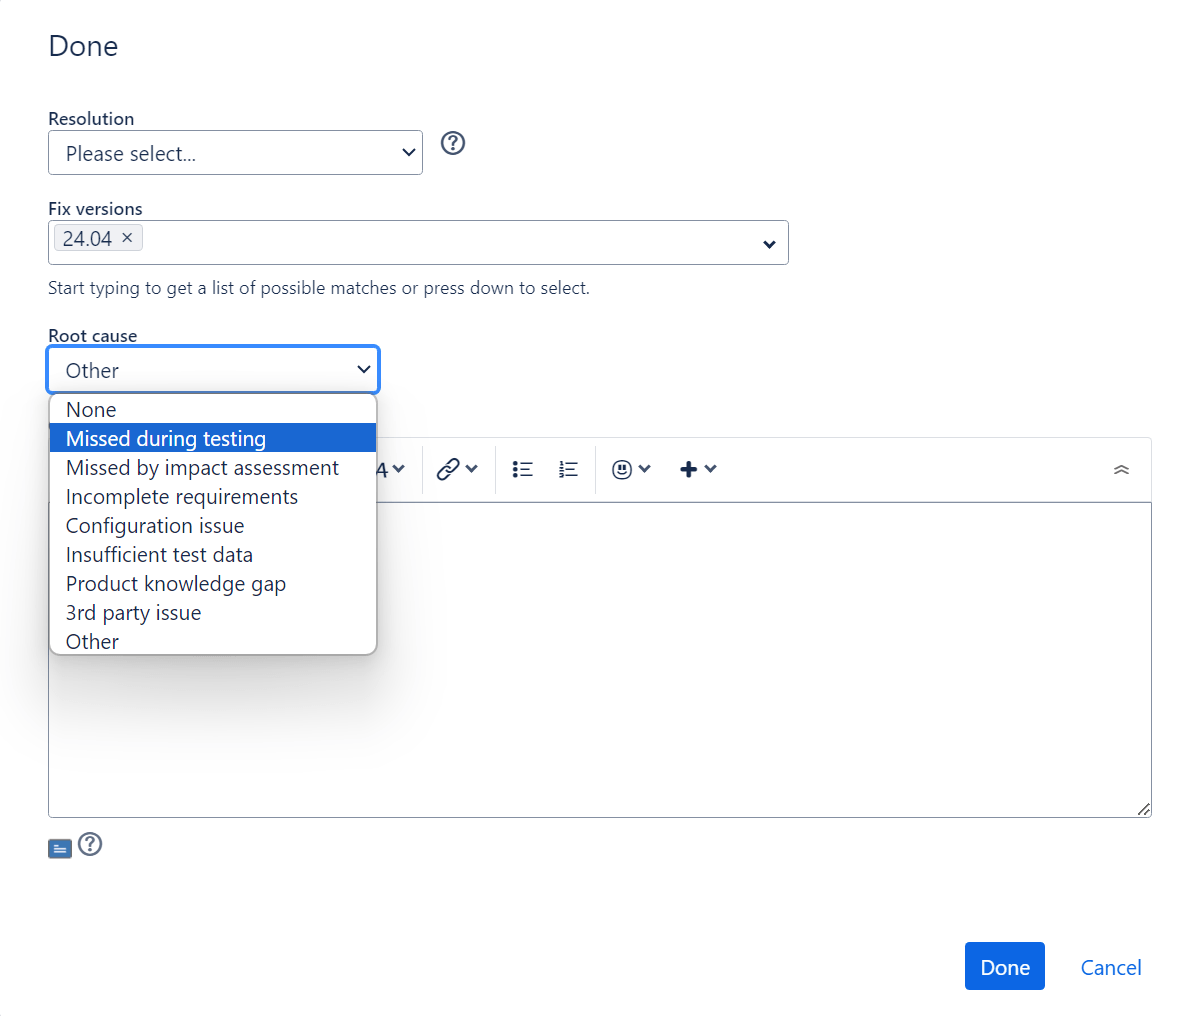
If you have successfully followed these steps, when you transition a Bug issue type on your board to the “Done” column, a Resolution screen similar to the one shown in the image on the right will appear. Here, you can select the root cause associated with the bug from the newly created “Root Cause” custom field dropdown.
Please review the video demonstrating the process:
If our previous article convinced you of the performance-related benefits of root cause analysis, consider requesting your Jira administrators to carry out these configuration steps on your instance. This will enable root cause data collection in Jira, empowering you with valuable insights. Leverage the Performance Objectives app for Jira to create comprehensive RCA reports and track various KPIs directly on your Jira dashboard.
Start your 30 days free trial of Performance Objectives: Charts for Jira from Atlassian Marketplace.